Tuesday
May102011
Extend Animation Tracks in Cinema 4D
 Tuesday, May 10, 2011 at 4:38PM
I recently had a minor crisis working on a job when my client asked me to add a bit of tail to the show open I was working on. This happened near the end of the job where the open was already completely rendered out. They wanted the camera to continue drifting past its final position so they would have some leeway on cutting for the editors.
I panicked. Trying to animate the camera afterward while keeping the previous animation so it was a seamless transition was going to be an immense amount of work. It was going to be a lot of tweaking with rendering out tests to check out. It was going to take hours of work when I had other stuff that required my focus. I could have redone the previous animation but it was all rendered out and I was nearing delivery. No chance of re-rendering everything.
Luckily, a friend of mine pointed out options in the animation tracks that would help me out.
Here is my first animation:
You can see the curves, where they start and stop. Switch to keyframe view using the button at the top.
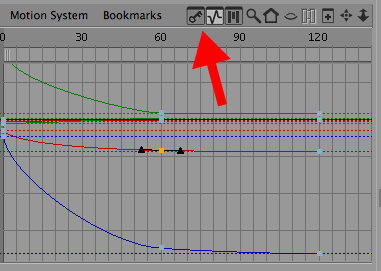
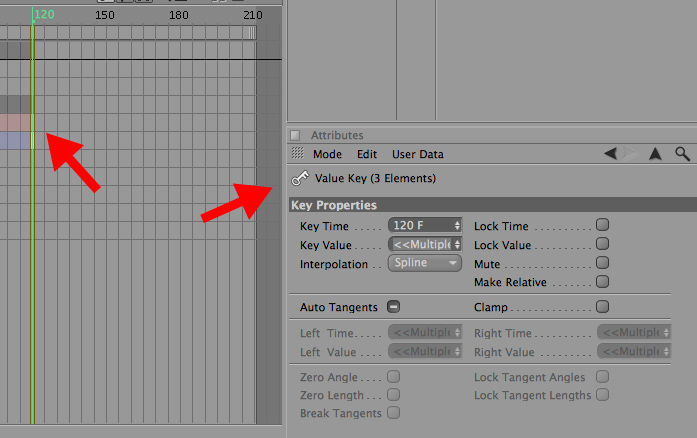
If you select one key, you bring up the attributes for that key in the Attribute Manager. However, this is not what we are looking for.
If you select the item you are animating, in my case the camera. It will select the entire animation track. Doing so will bring up the track attributes. This has a number of options, which you can explore, but we are focusing on the "After" setting.
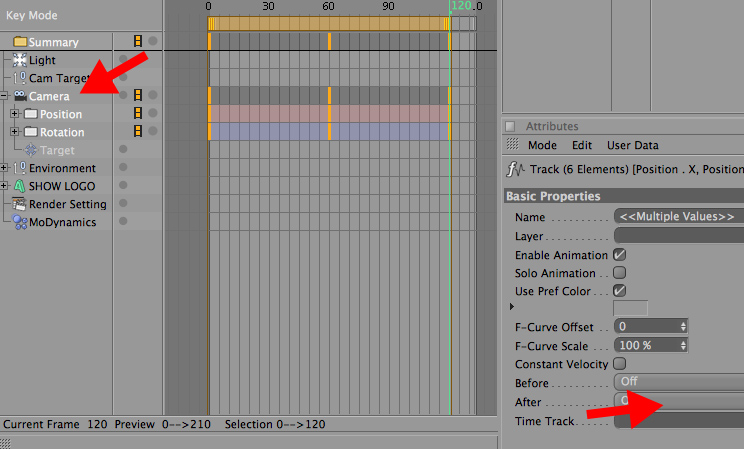
In this specific case we want Continue.

This will take the animation curves from before the end of the final keyframe and extrapolate where the animation would, you guessed it, continue.
If we switch back to our curve view, we can see new lines added to our animation. These black lines represent the new animation that C4D figured out for you.
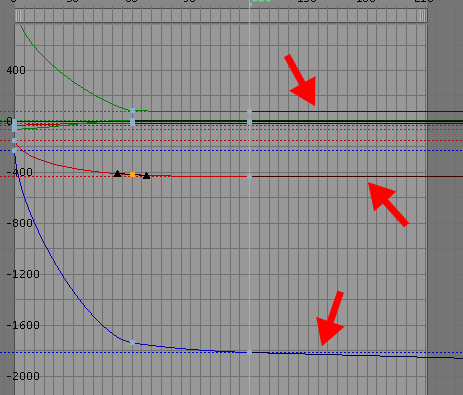
Let's take a look at it in motion.
Yeah, it's subtle. But your client only wanted a slow drift so they weren't holding on a still frame. It's enough.
Of course, Continue isn't the only option under this menu. This picture is from Maxon's extremely helpful Help files for Cinema 4D. This uses a demo animation to show how each of the different options will extrapolate extra animations.

That's all for now. I hope this little tip will help you out in the future and maybe cut some panic out of your workday. If you have questions, comments or examples to show off, please post them below!
I've uploaded the scene file if you want to mess around with it. You can download it here. It's nothing that you can't do with a few minutes worth of it but if you want to just mess around, feel free.
PS. Yes, the Help files for Cinema 4D are extremely helpful. Check em out sometime instead of posting on some forum and waiting around for someone to answer you. If they don't solve your problem, they will at least point you in the right direction.
I panicked. Trying to animate the camera afterward while keeping the previous animation so it was a seamless transition was going to be an immense amount of work. It was going to be a lot of tweaking with rendering out tests to check out. It was going to take hours of work when I had other stuff that required my focus. I could have redone the previous animation but it was all rendered out and I was nearing delivery. No chance of re-rendering everything.
Luckily, a friend of mine pointed out options in the animation tracks that would help me out.
Here is my first animation:
You can see the curves, where they start and stop. Switch to keyframe view using the button at the top.

If you select one key, you bring up the attributes for that key in the Attribute Manager. However, this is not what we are looking for.

If you select the item you are animating, in my case the camera. It will select the entire animation track. Doing so will bring up the track attributes. This has a number of options, which you can explore, but we are focusing on the "After" setting.

In this specific case we want Continue.

This will take the animation curves from before the end of the final keyframe and extrapolate where the animation would, you guessed it, continue.
If we switch back to our curve view, we can see new lines added to our animation. These black lines represent the new animation that C4D figured out for you.

Let's take a look at it in motion.
Yeah, it's subtle. But your client only wanted a slow drift so they weren't holding on a still frame. It's enough.
Of course, Continue isn't the only option under this menu. This picture is from Maxon's extremely helpful Help files for Cinema 4D. This uses a demo animation to show how each of the different options will extrapolate extra animations.

That's all for now. I hope this little tip will help you out in the future and maybe cut some panic out of your workday. If you have questions, comments or examples to show off, please post them below!
I've uploaded the scene file if you want to mess around with it. You can download it here. It's nothing that you can't do with a few minutes worth of it but if you want to just mess around, feel free.
PS. Yes, the Help files for Cinema 4D are extremely helpful. Check em out sometime instead of posting on some forum and waiting around for someone to answer you. If they don't solve your problem, they will at least point you in the right direction.

Reader Comments (3)
Really Great Information and Graphically
Nice Designing very nice
Great tip not seen elsewhere!