Tuesday
May102011

Extend Animation Tracks in Cinema 4D

I recently had a minor crisis working on a job when my client asked me to add a bit of tail to the show open I was working on. This happened near the end of the job where the open was already completely rendered out. They wanted the camera to continue drifting past its final position so they would have some leeway on cutting for the editors.

I panicked. Trying to animate the camera afterward while keeping the previous animation so it was a seamless transition was going to be an immense amount of work. It was going to be a lot of tweaking with rendering out tests to check out. It was going to take hours of work when I had other stuff that required my focus. I could have redone the previous animation but it was all rendered out and I was nearing delivery. No chance of re-rendering everything.

Luckily, a friend of mine pointed out options in the animation tracks that would help me out.

Here is my first animation:


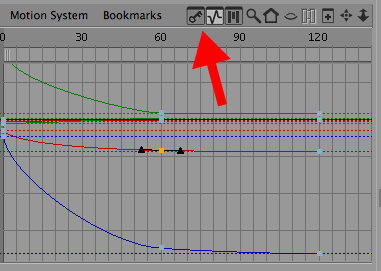
You can see the curves, where they start and stop. Switch to keyframe view using the button at the top.


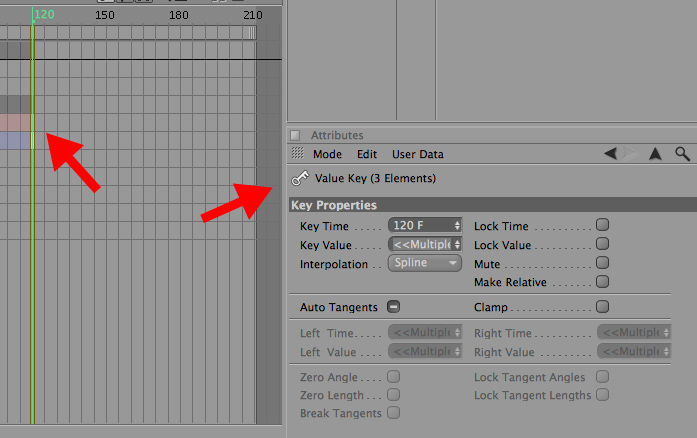
If you select one key, you bring up the attributes for that key in the Attribute Manager. However, this is not what we are looking for.


If you select the item you are animating, in my case the camera. It will select the entire animation track. Doing so will bring up the track attributes. This has a number of options, which you can explore, but we are focusing on the "After" setting.
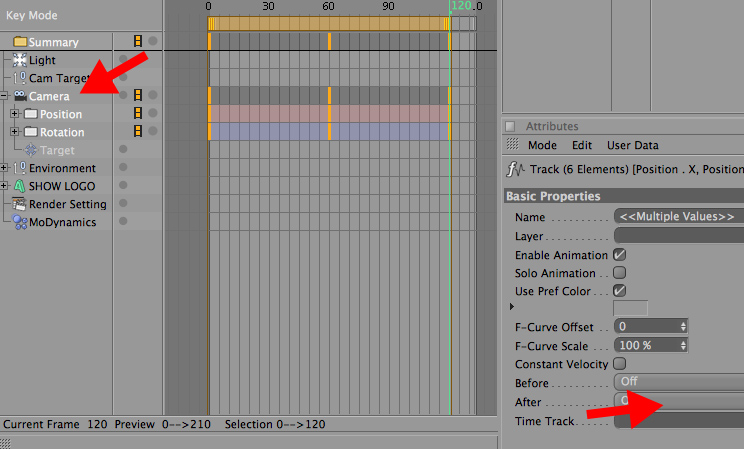


In this specific case we want Continue.


This will take the animation curves from before the end of the final keyframe and extrapolate where the animation would, you guessed it, continue.

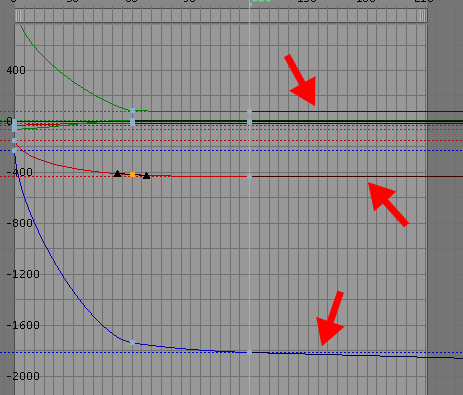
If we switch back to our curve view, we can see new lines added to our animation. These black lines represent the new animation that C4D figured out for you.


Let's take a look at it in motion.


Yeah, it's subtle. But your client only wanted a slow drift so they weren't holding on a still frame. It's enough.

Of course, Continue isn't the only option under this menu. This picture is from Maxon's extremely helpful Help files for Cinema 4D. This uses a demo animation to show how each of the different options will extrapolate extra animations.


That's all for now. I hope this little tip will help you out in the future and maybe cut some panic out of your workday. If you have questions, comments or examples to show off, please post them below!

I've uploaded the scene file if you want to mess around with it. You can download it here. It's nothing that you can't do with a few minutes worth of it but if you want to just mess around, feel free.

PS. Yes, the Help files for Cinema 4D are extremely helpful. Check em out sometime instead of posting on some forum and waiting around for someone to answer you. If they don't solve your problem, they will at least point you in the right direction.
Tuesday
Mar012011

In Defense of Co-op in Elder Scrolls: Skyrim

With the announcement of Elder Scrolls Skyrim, the internet is buzzing about the long awaited follow up to Oblivion. A teaser was shown, hinting at the story with an actual gameplay trailer revealed last week. The game, as you can imagine, looks incredible and many, yours truly included, cannot wait for a release.

But, because we know little about the game, the internet is abound with theories, rumors and wishes. After a recent discussion with a friend over the inclusion of co-op play, I have come here to defend my belief that co-op play, when done right, would be an incredible addition to the game.

Let me preface by saying that I do not think the game will have co-op play, unless modded in by a user after release. Bethesda has a long tradition of providing rock solid single player experiences and I do not think they will deviate from that tradition. So let's play pretend.

My ideas are all based on the premise that if co-op was included, it was done right and it worked right. My idea for co-op would work in the same vein as Borderlands: you can drop in anytime to anyone's game and play along side them. You will not gain progress in your game but be allowed to retain any experience or loot you attained while buddying up.

The single biggest complaint about a co-op experience in an Elder Scrolls game is that the experience is built around a rich, immersive world that you can interact with to your heart content. Adding in a second (or third) player would ruin the immersion the world crafts for you. However, I disagree. I think the addition of a companion would allow you to add another layer of complexity to the experience.

You could approach a certain quest differently, maybe having your companion distract a target while you steal something from their bedroom. You could dungeon crawl together, splitting up at a fork and reporting back to each other. Add in a proximity based chat that makes it so you can't talk to someone unless they are within shouting distance would add a degree of realism to it. Unless you cast your Mind Connection spell that opens up chatting for a few minutes. Or something like that.

A co-op system would also allow for the combat system to deepen immensely. Partner up with a mage and wait for them to cast a weakening spell while you hack away at their armor with your huge claymore. Take up your shield and sword and distract the target while your partner sneaks behind for a critical hit.

The game give you a gigantic world to explore and make your own. Why not make it your (plural) world?

Of course, we can take it one step further and create a single game experience for both of you. When starting a new game, the players are locked into that world. They can load up the game anytime and do quests, dungeon crawl and hunt or whatever. However, if a quest is finished, or a dungeon is cleared, the other player does not have access to that content unless they were there when it happened.

This would exclude the guild type quests because with those, you are building your own character and could take different paths from your companion. But if your partner razes a village from marauding dragons and you had decided to pay attention to your forlorn wife, you miss out on that quest and any rewards from it. But you are free to participate in the follow up quest, taking the bleeding dragon heart to the dying monk. Or whatever.

There would even be unique questing opportunities to explore. Imagine a quest that requires a second player to be at a different spot in the world, activating a magical rune at the same time that you activate it's sister rune across the world.

The questing system could scale up depending on the amount of players involved. You have three adventurers in your party? The quest scales to three runes to be activated. Need to collect a piece of a long lost key? Well, now you need to collect three pieces, in three different dungeons. You can split up to get each piece on your own or you can party up and tackle each dungeon together.

The Elder Scrolls games have proven that if given a rich world, players will immerse themselves in it. They are true role playing games. Given the chance to create a party to explore the role playing opportunities, I think players will jump at the chance to create deeper and richer experiences with their friends, far better than a single player experience could provide.

I think the inclusion of co-op in the world of Skyrim would be amazing chance to party up with your friends and enjoy the world that Bethesda has created.

Jordan Montreuil is a motion graphics designer living in LA. You can view his reel here.

Saturday
Nov062010

Using Weight Transform in Cinema 4D to Control Your Effectors

I was working on a short video for my reel and I was having troubles getting my Cloner Object to interact with the Plain Effector the way I wanted it to. I had the Plain Effector rotating the objects and shooting them into Z space. I would then pull down the strength to animate them back into place. The problem was, all of the objects shot back into place at the same time. I wanted to stagger the clones and I tried to use a Random Effector to change this but I couldn't get it to work.

Then I remembered reading about Weight Transform. I'm sure you've looked it at. Played with the slider and when it didn't do anything, you went onto something else.


Well, Weight Transform on it's own, doesn't do anything. It needs a brother (or sister) to play with, or something that can use the Weight. And that can be a little confusing so let me just show you. This is a grid of cubes, cloned.


Now, let's add two Plain Effectors, one with 45 degrees of Rotation and one with 50 units in Y Position applied.


With both effectors on, we can see the effects it has on the clones. But now, let's turn them off. That was just a reference for you to look back at as we get into Weight Transform. Next, we'll apply a Step Effector with all of the Transform options turned off and we'll crank up the Weight.


That's right. Nothing's happening. That we can see. But if we look under the hood and change the display options, we can see what the Step Effector is really doing. To do this, go to the Transform tab on the cloner and under the display mode, change the drop down menu to Weight. Now look at what's happening.


So what does this mean? It means that the Step Effector is using the Step mode to apply weight to each clone. It increases from one corner to the other, applying a value to each clone. Now, let's apply this value to the Plain Effector that is affecting the position of the clones. Enable the Plain Effector. The Clones jump right up. Now, in the Falloff Tab of the Plain Effector, there is a slider for Weight. As we slide it to 0, the clones drop to the ground as if we were using a Step Effector. But the Step Effector isn't using the position values at all, just the weight.

Cinema 4D Weight Transform for Postion from Jordan Montreuil on Vimeo.


In the video, we see the effect that the Step Effector's Weight has on the Plain Position Effector. Now let's do the same to the Rotation Plain Effector.

Rotation Weight Demonstration for Cinema 4D from Jordan Montreuil on Vimeo.


The Weight from the Step Effector is applied to each Plain Effector. Now, this type of animation would be entirely possible using just the Step Effector on the Clones but using Weight has so many more possibilities. Not only the Step Effector can apply Weight to objects, you can even use the Random Effector.


This is the same grid of cubes as before. But notice how instead of the gradiated color of dots on the clones, we have a smattering of colors? This is the randomness from the Random Effector. The same principles apply as the Step Effector. Turn on the Rotation Effector and play with the Weight Slider in the Falloff tab.

Random Weighted Rotation Demonstation Cinema 4D from Jordan Montreuil on Vimeo.


You'll notice that the Weight was applied even when the Weight slider was at 100% in the Falloff tab. In fact, the weight didn't go away until the slider read 200%. I believe this is because the slider computes the amount by subtracting the Weight amount from the Random effector from the amount in the Falloff tab. So with the Random effector providing 100%, you need 200% in the Falloff tab to override the Random Effector. If you had 50% weight in the Random Effector, then you would only need 150% in the Falloff tab of the Plain effector. Why? I don't know. Ask Maxon.

Now let's use Weight with the Position Effector.

Random Position Weight Effector Cinema 4D from Jordan Montreuil on Vimeo.


Adjusting the slider in the Falloff tab of the Position Plain effector changes how much the Position is affected by the Weight.

So, to sum it up. You can use Weight to affect your Effectors. Now, this isn't a whiz bang technique that you can just drop into your reel to wow your friends. This is a simple yet powerful workflow tip that change the way you animate and ultimately save time on your work. And when you save time, it gives you more chances to tweak your work while that deadline looms.

Now, I am just barely scratching the surface, I'm sure you can come up with something cooler than I demonstrated with. Post your results in the comments and show them off. Of course, if you have any questions or comments, please ask.

Monday
Sep132010

How to Use Cinema 4D's Animation Layers Feature in R11 and Above

For a recent project, I was stuck on a camera animation. I had built a camera animation that went along a path but then wanted to add some camera shake along the camera's X axis, like some horizontal shaking. I could have added a vibrate tag but I couldn't figure out how to get it to move the object on local coordinates instead of global coordinates.

I then remember that Maxon added Animation Layers to R11 and above. This feature allowed you to create an animation track and then build another track on top of that one without destroying the initial track. Cinema 4D blends the animations together in a nondestructive format. You could use multiple tracks to add multiple animations.

First step is to enable the feature on your object. Go to the Animation menu and select Add Animation Layer


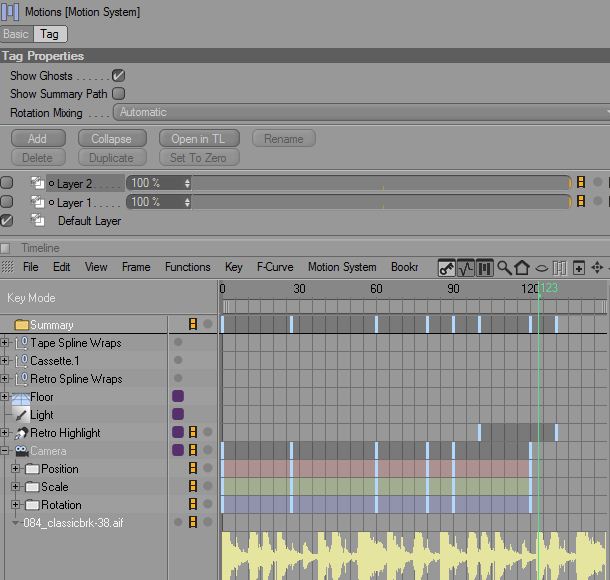
Then select the Motion Tag on your object.


This brings up the Motion System in the Attribute Manager.


Using the feature is surprisingly simple. It adds a layer manager that includes the default layer, named appropriately Default, and a second layer named Layer 1. Checking the Default layer shows the initial animation in the Timeline.


Check Layer 1 and it will bring up a blank timeline for the object, allowing you to create a new animation without destroying your first.


Click the Add button and you can add more layers to your animation.


You can change the strength of your added animations with the Sliders next to each in the Motions Attribute tab.

One thing to keep in mind is that if you add a Sound track to animate your object along with, the track will not show up in the added layers, only the default layer. You can jump back and forth in your browser figuring out your cues, which is a huge waste of time, or you can add markers in the timeline by going to Edit > Marker > Create Marker at Current Frame.


You can then select your other tracks and the markers will carry over.


This is a great way to keep an animation and add to it without destroying your initial work. I haven't even touched on the possibilities for Character Animation.

Question, comment or a made a cool video with the technique? Post it below in the comments!
Tuesday
Aug242010

Caged Insider: Introduction Video Proof of Concept and Breakdown

I completed a motion graphics intro for someone I work with who runs an MMA website called Caged Insider. He asked me for "something cool" (the one thing every designer wants to hear). I decided to go with the cage theme of fighters in a cage and I used the site's logo breaking free of the cage to go with that.

At first I went with an attack dog motif where the logo barked and snarled while trying to break free but he didn't want to associate MMA with Michael Vick. So ixnay on the ogday. But I kept the same feel for the rest of the piece. The camera is animated cinema verité style where its the POV of the viewer. You can check it out below. Read along after the video for a breakdown of the piece.

Caged Insider Intro from Jordan Montreuil on Vimeo.


Breakdown


The brunt of the work was done in Cinema 4D. I built the logo from vectors provided by the client and then built the stage. I had two major road blocks on this portion. The first one was the use of a dynamic swinging lamp. I wanted a lamp swinging back and forth in the scene. I tried to hand animate a lamp but it just didn't work. Then I tried building a chain with help that I got from Nick Campbell aka Greyscale Gorilla but the weight of the lamp didn't interact well with the chain. I ended up building a rig that uses Mograph 2, more specifically Modynamics. You can check out the lamp at C4D Cafe.


The second problem I had was getting the logo to burst through the fence. I originally opted for the Cloth module but again, I couldn't get the right feel for it. The pieces just wouldn't react the way I wanted them too. So again, I went with Mograph 2 and it's MoDyn feature. I attached an invisible block to the logo so that when it collided with the fence, the precut pieces would fly off and the logo would burst through the fence. Of course, this happens over the course of 3 frames or 1/8 of a second so you can barely tell that it happens.


After the piece was rendered out, I brought it into After Effects and finalized it. I ran it through the gamut of color correction and added in a nice lens flare to punch it up, courtesy of Video Copilot.


Thanks for reading and please free to comment below. If you have any questions, you may contact me.
Page 1 ... 2 3 4 5 6 ... 7 Next 5 Entries »